


more sketches of the "Beast"
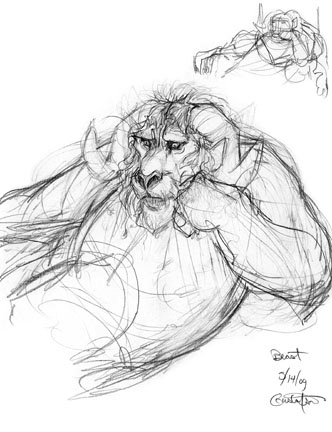


In these sketches , you can see a progression of studies on the "Beast" - and then a study showing what I thought might work for his seated pose - many of the elements of which ended up in the final painting.
reference model shots


Based on the rough sketch, I pose models (professional, willing family members, and myself!) - and try and get photo reference on what real bodies look like in the poses. Then I set up an assembly of shots on boards to look at while I refine the drawing.

more reference material

I gather a lot of photo reference material together when I'm working on my final composition. For this painting, I was imagining the "Beast" had qualities from several different animals, so I found photos and drawings of tigers, camels, and water buffalo, among others, to get general inspiration from.
I've always kept a drawing and photo reference file in my studio, which gets added to and edited over the years - so I always have reference material to look at.
Since I wanted this composition set in the time of the Renaissance, I also tried to find reference on what Beauty's harp might look like (see photo).
Revised drawing and preparation for final drawing

Revised drawing

I use a pretty low tech approach in creating these compostions, and rely on my copier and adhesive waxer machine to paste the various final elements together.
Here is a picture of my revised rough drawing - which was refined a bit after looking at model reference. I'm also including a shot of my drawing board, and you can see further refinements of both main characters in various sizes, and then the final composition that was composed of these xeroxed elements.

At the drawing board...
I'm also including a shot of my drawing board, and you can see further refinements of both main characters in various sizes, and then the final composition that was composed of these xeroxed elements.
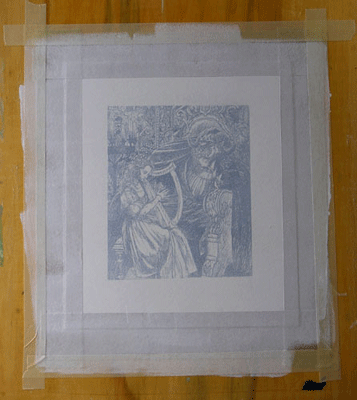
final drawing
Here's a copy of my final drawing. All of the elements are now worked out, and the drawing is ready to be enlarged for the final painting.
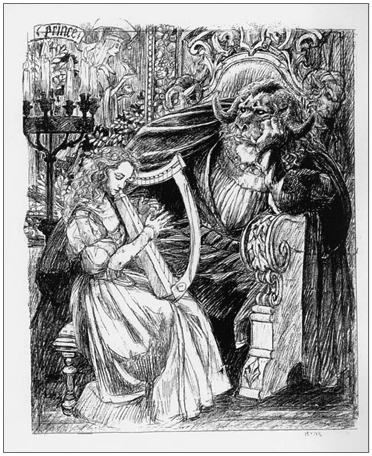

This large copy of the final image is now ready to be transferred onto the panel.
Transferring the drawing
I'm transferring the drawing onto the gessoed panel (which also has a glaze of raw sienna) by pressing down hard on the main lines, and then checking my progress under the graphite transfer paper.

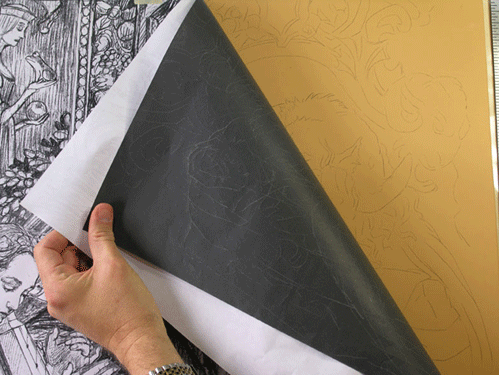
Transfer completed, and Imprimatura created
So, in order, I cut a panel to the correct size, then gessoed it and painted down a wash of raw sienna - then the main elements of the drawing were transferred down. This completes the imprimature stage. Now I can begin painting. I've included shots of the full panel, as well as a detail.


Detail of transferred image
Color study stages
Even though the large panel is technically ready for the final painting, one more step needs to be completed first: the color study. I always make a small copy of the finished drawing and try out various color schemes prior to starting a large painting- as I often am surprised to see what I might have envisioned in color either working - or not working! You can see the various stages of creating the color study here.
1. First the xeroxed copy is mounted to a board...

This is a close-up view...
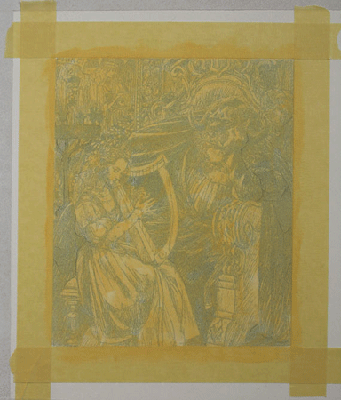
2. Next, a wash of raw sienna is put down, as it also was in the large imprimatura.

3. And here is my finished color study. At least, these are the colors I think I'm going to use... time will tell, however!
Finally, the final colors emerge - and I feel confident to move ahead. This study will be at the top of my easel throughout the process of the final painting.
Begin the painting

Day 1
6/18/09 - 3/4 day
I blocked in the chair, the Beast's cape and candle stand.
Today's palatte: burnt umber, Venetian red, and ultramarine blue.
Please note: because I didn't have this painting sequence professionally shot every day, you will undoubtedly see slight variations in the tilt of the panel, bits of my easel on the sides, and some subtle highlights and color variations on the painting that couldn't be avoided.
Hopefully, you will be able to overlook these variations and still be able to see the major points of the progression from day to day, until the final painting is shown.

Day 2
6/19/09 - Full day
I worked primarily on the Beast: his face, hand and arm. I also spent time trying to adjust the cloth that forms the skirt of his doublet.
I then put white in the candle flames.

Day 3
6/22/09 - Full day
Today, I added a raw sienna glaze/ wash on Beauty, and changed the contour of the cape behind her.
Then I developed the ram carvings and parts of the Beast's chair a bit more, and tightened the rendering on him.
Then I added a raw umber glaze on the background behind the Beast's chair, and roughed in the tapestry.

Day 4
6/23/09 - Full day
Today, I underpainted Beauty, added the base to the candle stand, underpainted the wooden stool, and extended the pool of light on the floor to the left and right.

day 5
6/24/09 - Full day
Today I established the line where the floor and wall meet, adjusted the back of Beast's chair - particularly the left side, and corrected the perspective.
(Even though I spend days on drawing, problems like this are sometimes not caught until the painting stage).
I also worked on Beauty's dress.

day 6
6/25/09 - Full day
Today I straightened the base of the candle stand, darkened shadows on Beauty's face, added the first layer of color to the tapestry, started finishing the back of Beast's chair, and added glaze to the background behind the chair.
Finally, I added reddish glaze to the chair cushion.
day 7
6/26/09 - Full Day
First off, today I applied a coat of retouch varnish.
My palatte: viridian green, Windsor violet, ultramarine, raw umber, burnt umber, burnt sienna, Venetian red, raw sienna, yellow ochre, bright red (WN), cadmium yellow, (WN) Underpainting white(WN), and Permalba white.
I addded ultramarine with a burnt umber glaze on the tapestry, and also worked on shadow areas of chair back, using Venetian red, ultramarine, cadmium yellow and white. I also mixed about five values of cape red and began finish on the Beast's cape and doublet.

day 8
6/27/09 - 1/4 day
Today, I applied a raw umber glaze on the tapestry and candle stand, worked on the arm of the chair, and added retouch varnish on yesterday's work.

day 9
detail
6/30/09 - Full day
I only shot a detail of the Beast today. I worked on the skirt of his doublet, and his lap area, also on his shirt.
In addition, I applied a blue and burnt umber glaze over the tapestry and background, and refined the arm of the chair, as well some additional work on the cushion, chair back and floor.

day 10
detail
7/1/09 - Full day
Today I really started work on the Beast's face. It is when I work on areas like this, that I most respect the work of artists who can, in a few, deft strokes, seemingly arrive at their desired effects.
I, on the other hand, poke and dab my way toward an elusive goal, a destination that I won't know until I get there.
In addition to the work on the Beast, I also added a glaze of raw sienna on the candles, and added white and cadmium yellow on the flames.

day 11
7/2/09 - Full day
Today I continued work on the Beast's face (and set up a shadow box for reference. I used a bright and burnt sienna glaze on his cape and doublet, burnt sienna and burnt umber glazeson all parts of his chair.
Then I glazed in some color on Beauty's dress (departing from color study, I tried a violet/burnt umber mix on the sleeves and underskirt, and left the rest of the dress closer to the raw sienna glaze color of the under painting. I anticipate making the violet cooler tomorrow.

Beast head detail
Detail inside shadow box.

Quick shot of the studio set up - showing the shadow box with controlled lighting.

day 12
7/3/09 - Full day
I decided to change the color on Beauty's sleeves and under skirt, using a palette of violet, ivory black, raw umber and white.
I also worked on her dress, using a palette of violet, raw sienna, burnt sienna, burnt umber and white.

Beauty detail - Day 12

day 13
detail
7/6/09 - Full day
Today I concentrated on Beauty's face and hair (this is the first day, and I'm anticipating going back into this area again.
I added a glaze of raw sienna on the gold areas of her dress, and lightened the blue violet highlights slightly.

Beauty detail - Day 13

Beauty detail - Day 14
day 14
detail
7/7/09 - Full day
I continued to work on Beauty's face, adjusted the shape of her hair, and then worked on her hands and the harp.
Studio shot - at the easel with reference all around

Beauty detail - Day 15
Day 15*
*This is Day 15 of the painting, but if you include the time it took to get from the first sketch stages to this point, I'm really on Day 28 of the project.
7/8/09 - Full day
I made subtle adjustments to Beauty's face, and also worked on her hair, and made her left hand smaller...
When I started this morning, I assumed I'd be finishing Beauty's dress and blouse, but when I started making minor adjustments to her face based on new things I was seeing in my reference material, I had no idea I would spend almost all day on these subtle moves. As it often happens, just when I think I'm done with a face, I mess around just a bit more - a final tweek - and the next thing I know, I'm making all sorts of very minor changes that add up to sometimes cause major problems.
I think today's alterations were sound, though, and I don't regret the additional time. I still haven't decided as of yet whether or not I'm going to put flowers in her hair. With any luck, tomorrow will be "dress day."

Beauty detail - Day 16
day 16
detail
7/9/09 - Full day
I thought I would add ornaments and trim to Beauty's gown and be done with her, but as I started on the sleeves and bodice, and worked my way down to the skirt, I realized the way in which I had draped the outer skirt didn't look right. It seemed to me that more of the under skirt should show, to give the proper and most flattering look to the dress.
Once again, I found myself spending more time working on something I thought was 90% finished. I blocked in as much as I could, wet on wet today.
Tomorrow, when it's dry, I will try and finish the skirt. The trim will have to wait until that paint is then dry.
day 17
7/10/09 - Full day
Today I finished the skirt fabric, and tightened up the rendering on her harp. I also added a glaze of raw umber on the wall behind the chair, and made some adjustments to the floor shadows.
Then I highlighted the shadow side of the Beast's shoulder, and did some minor finishing work on the arm of the chair.
day 18
7/13/09 - Full day
I added raw sienna and burnt sienna glazes on the gold part of Beauty's skirt, and added the dots on her sleeve.
Then red/burnt sienna glazes were done on the Beast's cape, along with finishing work on Beauty's harp, additional finishing work on the arm of the chair, and final work on the Beast's face.
I also decided to enlarge the shadow shape where the Beast's cape and sleeve meet on his left arm, and added more rendering on the chair back.
Finally, I added a golden ochre/raw sienna and burnt umber glaze on the tapestry.

day 19
7/14/09 - Full day
More finishing...

day 20
7/15/09 - Full day
More finishing...
day 21
7/16/09 - Full day
More finishing...

Beauty detail - Day 21

Day 22
7/20/09 - Full day
More finishing...

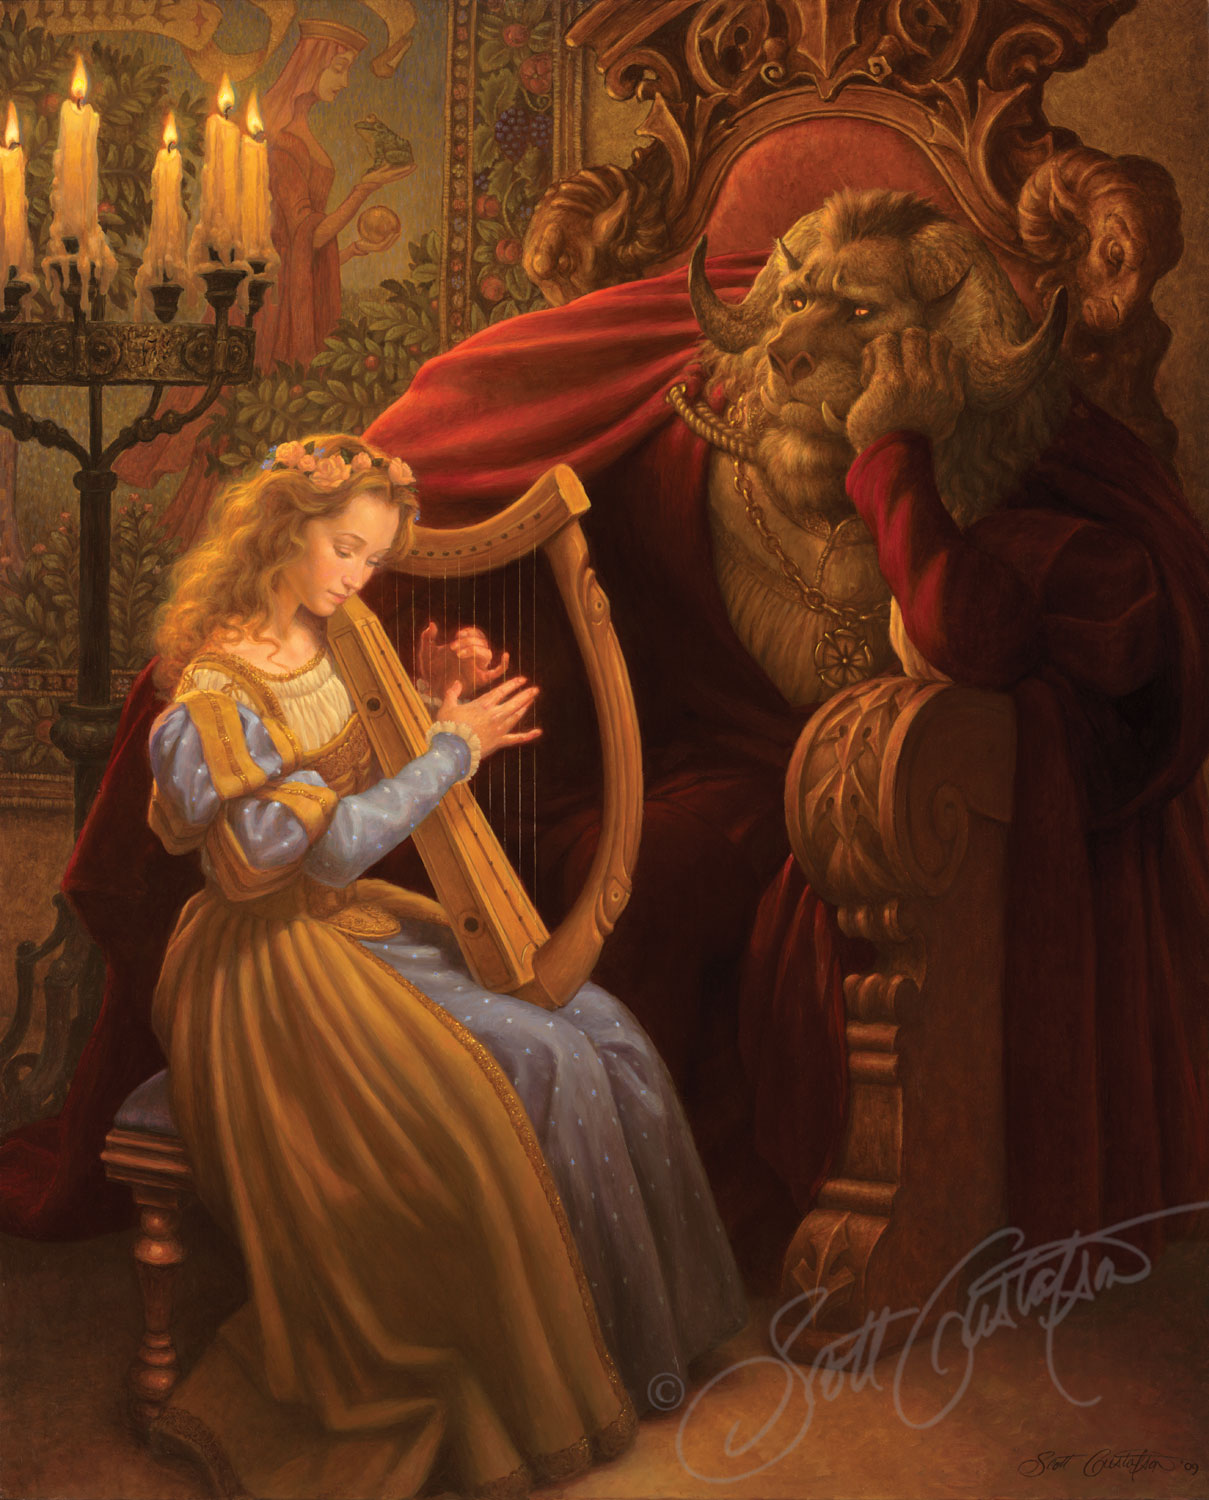
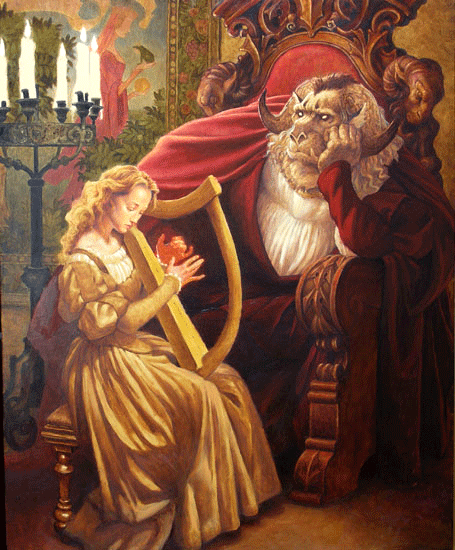
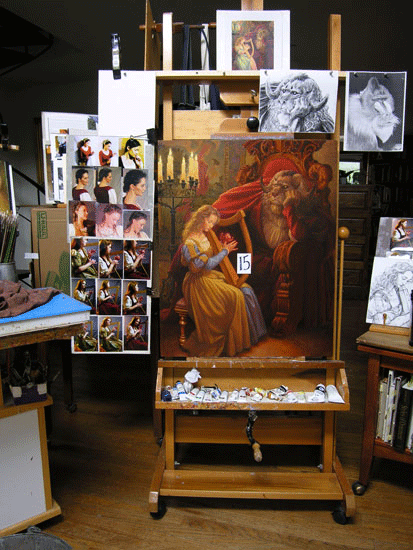
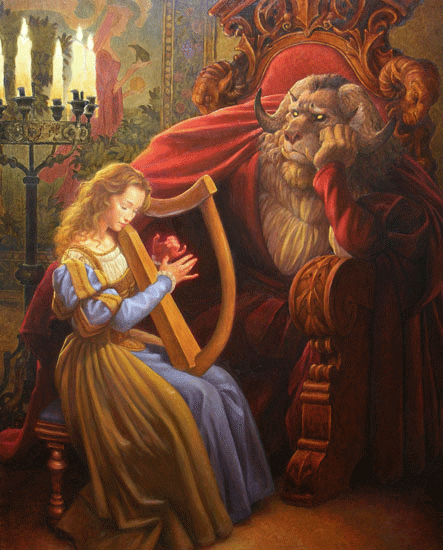
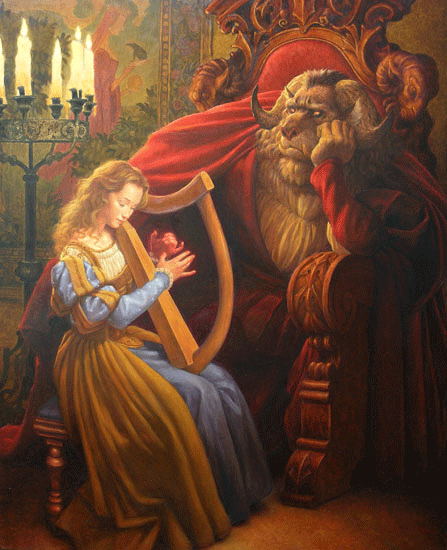
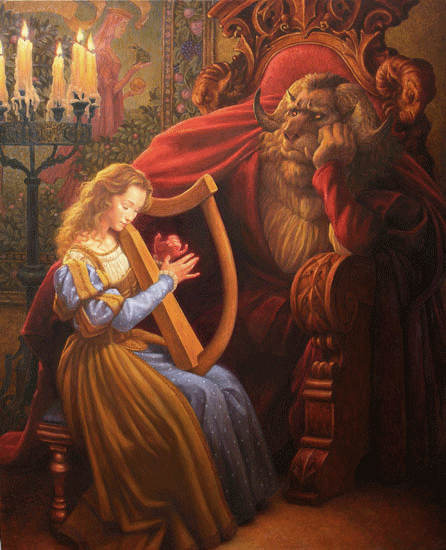
BEAUTY AND THE BEAST
final painting
DAY 23
Final painting completed! This was day 23 on the painting, but it took a total of 35 days to get from rough sketch to the final painting. These paintings always take longer than I originally think they will! Fortunately, it was a lot of fun to work on.
Hope you enjoyed the progression! --SG
Oil on panel
26" x 32"
This original oil painting was sold to a private collector, but here’s a link to available giclee prints at The Greenwich Workshop.
MORE THOUGHTS ON THIS IMAGE:
"Every evening the Beast comes to visit Beauty in her chamber, to talk with her and be near her. Tonight, as she sweetly plucks the harp strings, her mind wanders home to her father and sisters she misses so terribly. He, on the other hand, can think only of her. Every night before he leaves, this longing for her wells up and consumes him and he is compelled to ask, “Beauty, will you marry me?”
And every night her answer is the same: “Even though I have grown to care for you very much, Beast, I do not love you. I am sorry, but no, I cannot marry you.”
He exhales his grief in a deep sigh that echoes like a moaning wind through the palace corridors. Neither of them is aware at this moment that a bond has grown between them. Nor do they know what miracles the love they share will ultimately reveal.
In folkloric circles, the story of "Beauty and the Beast" belongs to a story motif called a Beast Marriage. This happens to be a very common motif and appears in many tales and ballads throughout the world, one of the most famous variations being Grimm's fairytale, "The Frog Prince."
Since, from the very beginning I knew there was going to be a tapestry in the background of this piece, the only question was what would be the subject matter. Ultimately, it seemed only fitting that the Beast might have chosen for his wall décor an image depicting characters from a story so similar to his own, and from which he surely would have derived much inspiration." --SG